---
title: Using seating areas
description: How to leverage seating areas to create specific availability.
---
[Skip to content](https://avvail.com/support/using-seating-areas#main-content)
English
Show submenu for translations

Open main navigation
Close main navigation
- English
Show submenu for translations
- Contact us
Contact us
How can we help you?
- There are no suggestions because the search field is empty.
1. [Restaurant Resource Center](https://avvail.com/support?hsLang=en)
2. [Account Settings](https://avvail.com/support/account-settings?hsLang=en)
# Using seating areas
## Create seating areas to set area-specific availability.
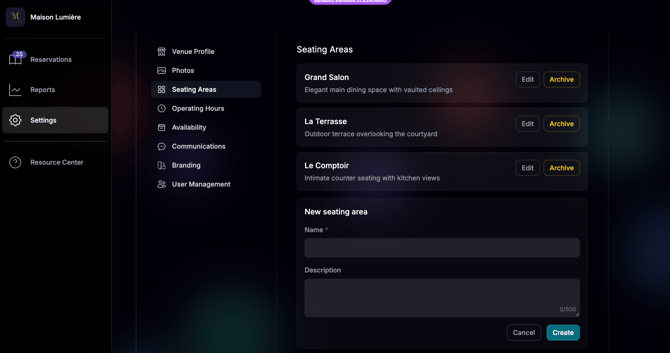
For different areas of your venue (e.g. main dining room, patio, etc.) you can now create Seating Areas in your Avvail dashboard for guests to book. Once the seating areas have been created, you can create availability rules for each seating area to control the bookable seats in each area.
#### STEPS TO CREATE A SEATING AREA
##### 1. Navigate to the Seating Areas page in the **[Settings](https://dashboard.avvail.com/settings)** tab of your dashboard.
##### 2. Click "+ Add seating area."
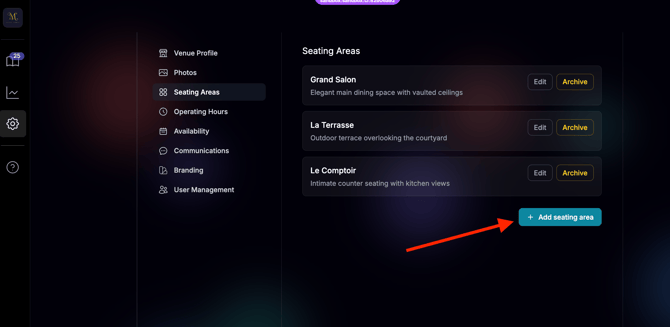
Names are required, must be unique among active areas, and are capped at 32 characters. Descriptions are optional.
##### 3. Save your changes.
Click "Create" to save. You can now use the seating area to create an availability rule.
#### STEPS TO ASSIGN CAPACITY TO AREAS
##### 1.. Navigate to the Availability page of the Settings tab of your dashboard.
##### 2. Create a rule and allocate the seats.
Specify how many seats belong to the area within a given time window. If a day has rules, the total seats across them must equal your committed capacity. In the "Where" section of the rule, select the seating area you'd like to rule to apply to.
For more information on availability rules, refer to this [support article.](https://avvail.com/support/setting-table-allocations-?hsLang=en)
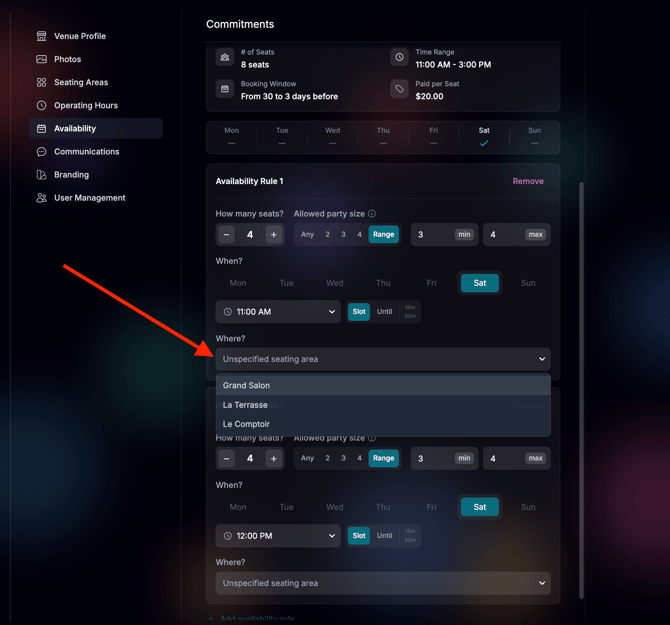
##### 3. Avoid overlapping rules.
Within any given time window, your availability rules must either **all specify seating areas** or **all leave it unspecified**—you cannot mix them.
Additionally, once a day has any rules applied, the total number of seats across all rules for that time window must exactly equal your committed venue capacity (e.g., 16 seats).
**How to handle the remaining capacity:**
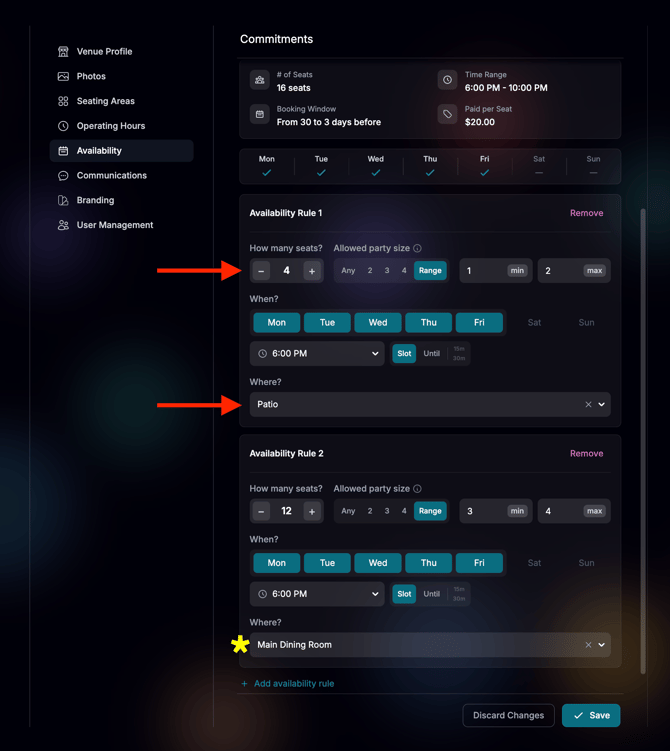
- **Area Partitioning:** If you create a 4-seat Patio rule that covers the whole evening, you cannot leave the remaining 12 seats unassigned. You must write rules assigning those remaining 12 seats to other specific areas (like "Main Dining Room" or "Bar") for that same time window.
- **Time Partitioning:** You can mix area-specific rules and unspecified rules on the same day *only if* they do not overlap in time. For example, you can safely have a Patio-only rule from 5:00 PM–7:00 PM, and an unspecified rule from 7:00 PM–10:00 PM. If an area-specific rule and an unspecified rule overlap, the dashboard will block the save with an error.
EXAMPLE: To make 4 of your committed seats per night only available on the patio, your availability rules should look something like this.
Note that the remaining seats in this 16 seat allocation must also be assigned to seating areas since the timeframe is the same for both rules.
#### STEPS TO REMOVE A SEATING AREA
##### 1. Clear active rules.
Check your live availability rules and delete or re-scope any rule using the area. An area rule cannot be archived if a live rule still references it.
##### 2. Delete or archive the area.
Click "Delete" if the area has never been used. If it has historical reservations or rules attached, choose "Archive" to move it to the "Archived" drawer.
NOTE: Archived areas will still display their original name on past reservations for historical accuracy, and will appear as "Area Name (archival)" if pinned to older rules.
- [Account Settings](https://avvail.com/support/account-settings?hsLang=en)
- [Managing Reservations](https://avvail.com/support/managing-reservations?hsLang=en)
- [Reporting](https://avvail.com/support/reporting?hsLang=en)
- [TMS Setup](https://avvail.com/support/tms-setup?hsLang=en#main-content)
- [OpenTable](https://avvail.com/support/tms-setup?hsLang=en#opentable)
- [Resy](https://avvail.com/support/tms-setup?hsLang=en#resy)
- [SevenRooms](https://avvail.com/support/tms-setup?hsLang=en#sevenrooms)
- [FAQs](https://avvail.com/support/faqs?hsLang=en#main-content)
- [Terms of Agreement](https://avvail.com/support/faqs?hsLang=en#terms-of-agreement)
- [Cancellations & No Shows](https://avvail.com/support/faqs?hsLang=en#cancellations-no-shows)
[](https://avvail.com?hsLang=en)
[mailto:email@email.com](mailto:email@email.com)
Copyright © 2025, Guest.Tech